Meerkat

NetworkLocation 3 and Meerkat

Congratulations to Centrix.ca on today's release of NetworkLocation 3! NetworkLocation is a great app for the mobile computer user that lets you setup actions and preferences that happen based on where you are physically. It can detect networks, peripherals, and now, even your geographic location. It's a great time-saver if you frequent client sites where you need to turn off Growl, coffee shops where you need to turn the screensaver on and the volume down, or home when you need to connect to your server and set your default printer.

What's more, we've written a plugin for NetworkLocation for Meerkat support! Now you can combine Meerkat's great handling of SSH tunnels with NetworkLocation's great detection of where you are and what you need to be doing. NetworkLocation can even set your system-wide proxy settings, so you can more easily use Meerkat for secure SOCKS-based web browsing when you're on the go.

If you want to grab the plugin directly, it's available on the NetworkLocation site. Again, congratulations to the guys at Centrix.ca!

Make him an offer!

For the second year in a row, I'm proud to help Seth Dillingham in his efforts to raise money for the Jimmy Fund to fight cancer. His personal goal this year is $10,000, both by sponsorship of his cycling and (this is where I come in) his bundle auctions of Mac software.

If you'd like to help out, you can check out the info, where both Pukka and Meerkat are featured, build a bundle of the software that you want, and make Seth an offer for it.

There's a lot of great software on there -- apps that I use already include 1Password, DropDMG, MarsEdit, PlistEdit Pro, rooSwitch, Sound Studio, SuperDuper!, yFlicks, and YummySoup!, among others.

So go check it out!

Meerkat 1.1.1: minor tweaks

Posted in

Meerkat 1.1.1 is out and available immediately -- grab it on Meerkat's page. This release has a couple minor tweaks and bug fixes and lays some groundwork for future integration with other applications. That's all I'll say about that right now!

Enjoy and as always, if you have any questions or comments, head on over to the contact page.

Meerkat 1.1: status indicators, new preferences, and easier editing

Posted in

I'm pleased to announce Meerkat 1.1, available now! This release brings a slew of new features, a number of bug fixes, and some nice appearance changes.

I'll focus on three main changes in this post: status indicators, preferences, and easier editing.

Status indicators

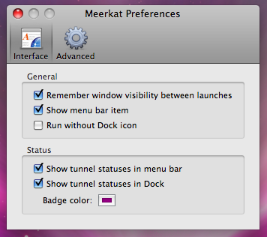
A much-requested feature for Meerkat has been a way to see the number of active tunnels (if any) at a glance, regardless of which application is currently active. Also, several people have mentioned that they would like to know when tunnels are being brought up or down with a similar notification (aside from Growl, which is already supported but that not everyone uses).


I'm happy to report that Meerkat 1.1 does both, and it does it in the dock as well as the menu bar. You can show or hide both of these indicators (they default to show) and you can even customize the dock badge color in...

Meerkat's new preferences

After some feedback, plus some thinking on where to put the new options, Meerkat's preferences window has gotten a big boost in style and ease of use. See for yourself!

I hope that this makes it easier to find what you're looking for as well as clearer to understand what some of the options do and how they are related.

Easier editing

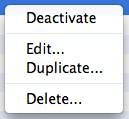
Lastly, another feature that made it into this release is a contextual (i.e., right-click) menu for Meerkat's tunnels and accounts, where you can easily edit, delete, or, in the case of tunnels, activate and deactivate the current selection. Along with that, you can now duplicate tunnels and accounts with one click for those times when you need to make several similar, but slightly different tunnels.

That's all for now -- as always, the full release notes are in the help book and appcast. So, go get Meerkat!

Offline Subversion: Building a Trac of your own

trac_svn.png

I have recently, like many other folks, become a fan of my friends Daniel Jalkut and Manton Reece's new Mac developer podcast, Core Intuition (especially the whimsical theme music). In their latest episode, Traveling Luddites, among other things, they discuss distributed version control systems such as Git, Mercurial, and Bazaar.

I'm kind of in the same boat in that I've spent little or no time trying these systems out compared to what I've been using, Subversion, and am a little hesitant to invest a lot of time into migrating and learning a new system. Don't get me wrong -- I'm a hacker and I love to try new technology. However, I don't really have any problems with Subversion and in fact, some time ago I came up with a really sweet setup for offline development, offsite backup, and integrated project management using Trac that I've been meaning to blog about, and this episode was just the catalyst I needed.

Following the directions here, you will get:

  • Offline access to your versioning, ticketing, and documentation systems.
  • Support for multiple projects (though one project is just fine, too).
  • A multi-user setup, if you need it.
  • Integration of your code repository with web-based ticketing, GUI changesets and diffing, activity timelines, and project roadmap planning.
  • Complete, incremental offline backup whenever you like (and have a connection).
  • Very little intrusion into your Mac OS X environment.
  • Complete flexibility in getting your data out at any time.

Just have a look around the Trac demo to get a feel for this system. It was a tremendous thrill during the development of Meerkat to see the roadmap progress meter get ever closer to the 1.0 milestone as I closed tickets and definitely helped me organize the project much better than before I adopted Trac.

And this isn't rocket science -- if you're already technical enough to be using version control, I'm pretty sure you can handle this and have a great setup in a short amount of time. I've found that the parts that trip most people up are Trac installation and Apache configuration. Relax, I've got you covered.

A quick historical note

I've been using Subversion in both user and administrator capacities since 2001 and before that, like Daniel and Manton, I too had a painful coexistence with CVS (and still do sometimes with projects like Drupal). I was introduced to SVN by a former co-worker, Garrett Rooney, back in the days when he was one of the few people who knew about and worked on SVN. Since then, he literally wrote the book (Practical Subversion) on SVN and through the years, I've come to really love the project and have introduced my fair share of folks to it as well.

While, as I said, I'm generally open minded about new technology and systems, when it comes to version control I'm in the camp right now of "if it ain't broke, don't fix it". I'm using Trac on some other client projects, including one with a team of over 30 people all over the world, and I use SVN for the development of both Pukka (over two years of commits) and Meerkat (about a year of commits) as well. It works well for me, I don't have hassles, and since SVN has been integrated with Trac, Apple's Xcode, and the Apache web server that ships on OS X, it's going to take free pony rides or something comparable before I seriously look elsewhere for my version control needs. Of course, YMMV.

What you'll need

In order to replicate this setup, you'll need:

  • A Mac running Leopard and administrator access to it.
  • Familiarity with SVN, but you don't need an existing repository.
  • Some Terminal experience.
  • About an hour to spare (or less, and not counting some background compilation time in which you can do other things).

If you already have MacPorts installed, you'll save even more time and you won't even need to manually download anything else.

Ready? Let's do it.

Install MacPorts and Trac

I'll admit it, Trac can be a little intimidating to setup because of dependencies. But if you get MacPorts, this can all be reduced to a fraction of the time and very little hassle.

  1. Install MacPorts if you don't have it already. The latest installer package for Leopard is here.
  2. Make sure that /opt/local/bin is in your path so that the commands provided with MacPorts are available to you easily in the Terminal.
  3. Open up Terminal and start the Trac installation process by typing sudo port install trac.
  4. Let it roll while you grab a $BEVERAGE or move on to the next steps. When it finishes, you should be able to access a command called trac-admin in Terminal. Depending on what ports you already have installed, you may need to answer some basic questions during the install process, so keep an eye on the window. Brian Cooke's Growl When Done is a good solution here.

Setup Subversion

You'll need to setup a parent directory for your Subversion repository or repositories. I like /usr/local/svnroot, so if you are using someplace else, you'll need to alter the directions below as appropriate. Keep in mind that stuff under /usr/local gets backed up by Time Machine by default, even if you exclude "System Files and Applications". This is separate from the backup mechanism that I'll talk about in just a little bit.

  1. Make a top level Subversion folder using sudo mkdir /usr/local/svnroot and change into it.
  2. Either move an existing repository into a subfolder of this folder, or create a new repository folder using sudo svnadmin create MyProject in Terminal.
  3. Make the whole setup owned by Apache, which on Leopard can be accomplished with sudo chown -R _www:_www . in the Terminal.

Setup Trac

Again, I prefer a similar convention here and put stuff under /usr/local/tracroot. Adjust as necessary.

  1. Make a top level Trac folder using sudo mkdir /usr/local/tracroot and change into it.
  2. Create a new Trac project using sudo trac-admin MyProject initenv.
  3. Edit the MyProject/conf/trac.ini file to configure it. You'll likely just need to change the following items:
    • max_size if you want to upload larger files to the wiki
    • downloadable_paths if you have a non-standard repository structure
    • link to something like http://localhost/trac/MyProject
    • descr, footer, name, and url if you wish
    • repository_dir if you didn't specify it during the initialization step
  4. Give your account full project permissions using sudo trac-admin MyProject permission add <username> TRAC_ADMIN in Terminal (replacing <username> with your own username).
  5. Make it owned by Apache using sudo chown -R _www:_www . like you did with SVN.

Configure Apache

This is perhaps the trickiest part, but I've done the work for you. I did some poking around and figured out a good way to get this working with the Apache that is built into Leopard. Although I haven't tested the other parts of this guide for Tiger compatibility, Apache is pretty much the part that requires Leopard, since it ships with Apache 2 and has some of the modules necessary for SVN integration built in. If you have your own Apache 2 going with MacPorts or something else, perhaps this will still work for you.

First, you'll want to create a password file for authenticating your Trac and SVN users, even if it's just you.

sudo htpasswd -c /etc/apache2/other/htpasswd <username>

Be sure to replace <username> with your own username. This command will create a new password file at the chosen path and add your first user. If you have other users, repeat the command above with their usernames but leave off the -c option since the file already exists and you don't want to clobber the previous commands.

Next, you want to create a configuration file for SVN to make your repository available over the (local) web and to password protect it. Create a file at /etc/apache2/other/svn.conf that looks like this:

LoadModule dav_svn_module libexec/apache2/mod_dav_svn.so
LoadModule authz_svn_module libexec/apache2/mod_authz_svn.so
<Location "/svn">
    DAV svn
    SVNParentPath /usr/local/svnroot
    AuthType Basic
    AuthName "Subversion Repository"
    AuthUserFile /etc/apache2/other/htpasswd
    Require valid-user
</Location>

After this, make another file at /etc/apache2/other/trac.conf that looks like this:

ScriptAlias /trac /opt/local/share/trac/cgi-bin/trac.cgi
<Location "/trac">
    SetEnv TRAC_ENV_PARENT_DIR "/usr/local/tracroot"
    AllowOverride None
    Order allow,deny
    Allow from all
    AuthType Basic
    AuthName "Trac"
    AuthUserFile /etc/apache2/other/htpasswd
    Require valid-user
</Location>

Remember in both of these instances to change the paths as necessary if you put your SVN or Trac environments someplace other than the paths I mentioned above.

Once these files are set, go to Terminal and issue the command sudo apachectl graceful to let the configurations take effect. Once you do, you should be able to reach your Subversion repository at http://localhost/svn/MyProject and a list of your Trac projects at http://localhost/trac. Both will be password protected using the account(s) you created above.

Backing it up

You're almost there! The last bit is some scripting that lets you back both of these systems up to a remote server using rsync over SSH.

  1. Edit a new text file at /usr/local/bin/ts (or $HOME/bin/ts, if that's how you roll) and fill it with the following:

    #!/bin/sh
    echo "Backing up Subversion repositories..."
    /usr/bin/rsync -e ssh -avz --delete /usr/local/svnroot/ <username>@<hostname>:svn/Repository.sync
    echo "Backing up Trac databases..."
    /usr/bin/rsync -e ssh -avz --delete /usr/local/tracroot/ <username>@<hostname>:trac/Trac.sync

    Be sure to replace the <username> and <hostname> values with whatever username and hostname your SSH account has.

  2. In Terminal, use chmod 755 /usr/local/bin/ts to make the script executable.

Now, whenever you want to incrementally backup your SVN and Trac databases, just type ts (think: "trac sync") at the shell. Everything that has changed since the last time you performed this command will get copied up to the remote server, keeping a handy backup of both your SVN repositories and your Trac installations should you need to move to another server. And even without the Apache configuration, the SVN repository will be useful as a standalone. Just keep in mind that it is for backup purposes and there is not any two-way syncing going on. That is, your local copy is the authoritative copy and is the one that you should use from day to day, and ideally over HTTP and not using local filesystem access to /usr/local/svnroot directly.

Conclusion

This system has been really useful for me during the development of Meerkat and through the continued development of Pukka, since I've been able to easily track feature requests, bugs, wiki-based notes for future reference, and have it all tied together with Subversion commits. In addition, I've been able to take advantage of offline time while at airports or otherwise on-the-go to actually get code committed, issues resolved, ideas jotted down, and processes documented.

I hope that this guide has been useful to you. Of course, feel free to leave a comment if you have any questions or clarifications or find any typos and I'll try to correct them.

Happy Trac-ing!

Around the web in 80 seconds

Just wanted to pop in and mention a few appearances of our apps around the web recently since the Meerkat launch. Things are really moving this summer!

Again this year, I'm happy to announce that I'll be supporting Seth Dillingham in his efforts to raise $10,000 for cancer research and treatment. Last year, I was able to donate some Pukka licenses and this year, I'll be doing the same, plus adding Meerkat into the mix as well! I'll be blogging more about this as the time gets closer. How can you help? If you are a software user, check out his auctions, and if you are a Mac developer, please consider donating some licenses to your application(s) to help in his fundraising. Seth is riding his bike across the entire state of Massachusetts and all you have to do is continue to use great Mac apps to help!

Next up, I was happy to learn that a fun podcast, NeatLittleMacApps, reviewed Pukka recently. If you like, well, neat little Mac apps, you should check out this podcast and especially Pukka's episode. Thanks, NLMA!

Lastly, stay tuned soon for an update to Meerkat. I'm happy to report that thanks to some great beta testers, there are no known bugs in the 1.0 release, so I'm focusing on some great feature enhancements and additions for the next release. Have an idea? Contact me and let me know so that I can get it on the roadmap. And if you like Meerkat, please consider bookmarking it on del.icio.us (I know a great app you can use), adding it on iusethis, and posting a review on MacUpdate or VersionTracker.

The Meerkat is loose!

After many months of development, I'm pleased to announce that Meerkat is ready! As the tag line goes, UNIX power, Mac style: SSH tunnels made easy. Meerkat is an easy to use SSH tunnel manager built specifically for the Mac. A lot of blood, sweat, and tears has gone into this release and I'm happy (and relieved) to get to this point.

If you're reading this on the actual site, you may also notice that I've redesigned the website. I hope that it makes more information available, while staying uncluttered and more easily manageable.

Lastly, I've also moved from WordPress to Drupal as my content management system. There are many reasons why, and I hope to blog about them in the near future, but for now, please do drop me a line if anything seems to be out of place.

And now, go get Meerkat! :-)

SSH tunnels for the common man (and woman)

Posted in

Thanks to the fine folks at TUAW, I've been alerted to an interesting start to a series at Apple Matters called Using SSH: Secure Tunnels for the Common Man. There's a nice bit of explanation on the need for and the basic concepts behind SSH tunneling.

Of course I'd be remiss to not mention Meerkat, Code Sorcery Workshop's next application, built specifically to address the need for easy and feature-rich management of SSH tunnels. Even for folks like me who know the Terminal commands for SSH and the concepts behind rather arcane uses such as dynamic forwarding as a SOCKS proxy, it's very useful to have menu bar access, Growl integration, Bonjour capability, and other Mac-like features for a classic UNIX tool like SSH.

However, I think that even with a tool like Meerkat, it's important to have some sort of forum or knowledge base for various uses of SSH, which is something that I hope to start when Meerkat launches. It's tricky because part of an SSH tunnel is inherently personal (e.g., your account details), but the basic concept can be shared for other people -- whether it's tunneling to your home iTunes collection, accessing your colocated Mac server securely via screen sharing, or securely browsing the web while on guest networks.

Anyway, give the article a look. I look forward to the upcoming installments -- SSH is a dark art to many and it's good to shed some light on it!

Feature requests versus the "right way" to do it

One of the challenges of developing Mac software, particularly for an audience that is generally more technical than the average user, is that your users compare your application to others that are out there on the basis of how they utilize the rich set of technologies available on Mac OS X. And I'm not just talking competitors here, but any Mac application. This can be both a blessing and a curse, as it can inform you of and inspire you to add great new features, but can also cast a seemingly bad light on your own product if you are unable or unwilling to implement certain functionality. Users often don't care why you might not want to or can't implement features which are, in your own estimation, not the "right" way of doing something -- at least not right now. Other apps are doing it, why can't you?

I'm hoping to provide some insight into my thought process on making these judgement calls and talk about a specific issue that I've been working on in this department. I'll get a bit technical, but I'll try to explain along the way for the non-programmers in the room. And I'll mention a couple of other apps by name that handle the same issue in different ways. I don't mean to call out or embarrass anyone, and all the apps that I mention are ones that I use (and love) on a daily basis, but I want to show what other developers are doing. Lastly, I have an overriding goal here to be a somewhat exhaustive resource for this particular issue for other programmers to find, too.

What's up, dock?

A big feature request that's been hanging around for some time for Pukka is the ability to run without a dock icon. For a utility with a small footprint like Pukka, this makes a lot of sense for a number of reasons:

  • As of Pukka 1.6, a status bar menu provides omnipresence for all of the app's "background features" -- looking up bookmarks and visiting your links online.
  • Pukka is not visible when you are not using its "foreground features" -- posting bookmarks -- anyway. Some users would like to not have to think about it by seeing it in the dock and task switcher.
  • Pukka has long supported a "quit after posting" feature which quits the app entirely after a post is made. Since you can call Pukka via your RSS reader or the browser bookmarklet and since it's lightweight and starts quickly, Pukka can come and go only when you need it. People who like an uncluttered dock really appreciate this, though some people would rather have Pukka running all of the time, but still not in the dock. After all, lingering invisibly in the background is faster than starting up on demand.
  • "All the other apps are doing it!" :-) Apps that I use that have a user-configurable dockless mode include Twitterrific, MenuCalendarClock, Knox, BluePhoneElite, SSHKeychain, and iShowU. There are many more that do as well.

I should make a distinction here between applications like Lighthouse, Macaroni, and Growl (which I also use) which always run dockless, since these apps have alternate interfaces -- typically robust status bar menus or preference panes -- that allow use of the application. I'm talking about applications that let you choose on a whim whether you'd like to run without a dock icon or not -- defaulting, of course, like normal applications, to running with a dock icon.

Users who are used to dockless apps know the downsides -- no application switching, the app doesn't show up in the Force Quit menu, and sometimes there are window focus issues -- and are willing to accept them as limitations in Mac OS X. But there are some issues on the developer side that make this feature more difficult than one might think at first pass.

How do you work this thing?

The only real way* to make an application run dockless is to change a setting in a file inside of its application bundle -- though a variation on this exists, as I'll describe in a little bit.

* I do know about TransformProcessType, a Carbon call, which can go from dockless mode to having a dock icon, but this has to happen too early in the launch process to read a user's preference setting, plus it's only a one-way transition.

A Mac application is actually a folder named <application name>.app containing a number of files and folders, one of which is called Info.plist. This property list file contains entries such as the application's name, version, copyright info, and other info used by the system to query what the application is all about.

If you add an entry to an application's Info.plist called LSUIElement and set its value to a string containing the number one, relaunching the application will make it go dockless. There are even applications like Dockless and Dock Dodger that will do this for you for a given application. Most of the applications that I mention above use this method to go dockless.

However, I've long preferred not to do this for a couple reasons:

  • It's bad form for an application to modify itself -- though I realize it's not the end of the world.
  • If the user is not an admin or if the application is located someplace like a network-mounted share, the user will not be able to -- and shouldn't be able to -- modify the app bundle that is shared by other users or even other computers.
  • Lastly -- and this is the big one -- Apple introduced code signing in Leopard and, according to the documentation, it's only a matter of time before this method of altering the Info.plist will render the application unusable.

With code signing and Info.plist modification on the fly, the writing is on the wall:

A seal, which is a collection of checksums or hashes of the various parts of the program, such as the identifier, the Info.plist, the main executable, the resource files, and so on. The seal can be used to detect alterations to the code and to the program identifier. #

Various components of the application bundle (such as the Info.plist file, if there is one) are also signed. #

Your code must be immutable once signed. After signing, do not attempt to change executable code (including symbol tables), the Info.plist, or your program’s resource files. Do all that before signing. If you make modifications after signing, the signature may be invalid. #

And according to Apple, you should be signing code now. Not doing so can interfere with the keychain user experience, Parental Controls, firewall, and other integrated systems in Leopard that rely on code signing.

So, where does that leave us?

When I talked to Marko Karppinen, whose company makes the excellent Knox security application, at last summer's C4 in Chicago, he let me in on how he accomplished a user-specified dockless setting in that application.

If you look at the application bundle, it contains another copy of the application within a subfolder of the app bundle itself -- sort of a Russian Doll. But if you look closer, you'll see that all of the components of this "inside" application are actually symbolic links to the parent application's version, except for the Info.plist file. And -- you guessed it -- the internal Info.plist has the LSUIElement set. For the curious, here is a shell script that I came up with to be used as an Xcode build phase to accomplish this.

I'm actually using this method successfully with Meerkat, my next application (which is currently in private beta) and it's working ok for now. On launch, the application checks to see if if the user's preference setting matches the setting of the version being launched and if not, it launches the other one. Pretty sweet, right?

It is, except for one thing in Pukka's case -- Apple Event targeting. Besides being launched normally, Pukka can be launched by a number of external forces, including:

  • AppleScripts that interact with Pukka
  • Posted information from RSS readers like NetNewsWire using its author's External Weblog Editor Interface
  • Pukka's bookmarklet, which actually uses a custom pukka:// protocol to pass information
  • Opening http:// and https:// URLs with Pukka like you would with an alternate web browser
  • Opening a supported file, such as a .webloc on the desktop, a Pukka license file, or one of the Spotlight files that Pukka generates for easy access to your bookmarks via system searching

On launch, not only do I have to figure out if the right version is running, but if not, I have to pass whatever information actually launched the application to a new process. I've actually managed to accomplish this for everything but AppleScript, but it's still non-ideal. It comes down to the fact that it's just generally bad practice to have more than one copy of the same application on the same hard drive because Mac OS X's Launch Services can get confused as to which one it should be targeting.

On top of that, since Pukka uses Sparkle for auto-updating, some issues needed to be resolved in order to update the outer, docked application and not the internal, dockless one, even if the internal one is the one running the update. Overwhelmed yet?

Now what?

So right now, I'm at a loss as to how to proceed. Apple doesn't provide a tried-and-true way to let the user toggle an application's dock mode and although many applications implement this, it seems to me that no way is fool-proof nor future-proof. The last thing I'd want is to release the feature but have to revoke it later from paying customers because it's untenable.

Cocoa developers, anything obvious that I'm missing? Have you tackled these challenges? Are you thinking about adding the same feature to your application?

Meerkat use case: iTunes at home, music anywhere

Posted in

I thought I'd take a moment to outline a sample use case for Meerkat, one that goes outside the normal scenarios that most people think of when (or if) they think of SSH tunneling. Since Meerkat supports app triggers and Bonjour, it goes above and beyond plain old SSH and can really be used in some innovative ways.

Suppose that you have a large iTunes music collection on your home Mac that you either don't want or can't fit on your work Mac or your laptop because of its size. If you enable iTunes sharing on this home Mac, as well as SSH (under System Preferences -> Sharing -> Remote Login), you can use Meerkat to connect to this music collection from any other Mac running Meerkat and iTunes.

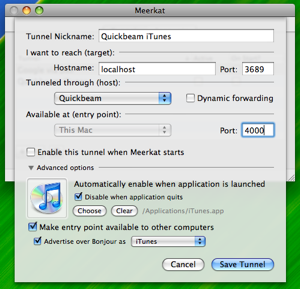
Just setup a tunnel in Meerkat using an account with the IP address, username, and password of your home Mac.

Meerkat-based iTunes sharing thumbnail

Meerkat-based iTunes sharing (click for larger screenshot)


You would pick port 3689, since this is what iTunes uses for music sharing, and an arbitrary port on the local Mac (doesn't matter what). It only takes a few seconds to setup a tunnel like this.

Because of the app trigger, whenever you start iTunes on the Mac running Meerkat, Meerkat will automatically connect to your home Mac securely and, because of Bonjour, your home iTunes collection will show up right in iTunes' source list, just like a Mac on the local network. You just select the collection and stream the music, just like if your home Mac was with you at work or next to your laptop at the coffee shop. It couldn't be easier!

Plus, Meerkat responds automatically to sleep and wake of your Mac as well as network change events such as outages or a change of location. Just set it and forget it!

After Meerkat is released, I hope to maintain a list of scenarios like these. If you have any further ideas, feel free to post them below, and if you're interested in being considered for the upcoming private beta, just leave a comment!

Syndicate content